1. ABOUT MacREM
Our MacREM system was purchased from Infonetica in 2018. Infonetica specializes in research management, ethics management, ethics approval and compliance training solutions. It is the same system currently in use by the Hamilton Integrated Research Ethics Board (HiREB), but there is no shared login access. The system we are calling McMaster Research Ethics Manager (MacREM) is a web-based electronic platform for conducting research ethics reviews and is built using modern infrastructure that exhibits a vast set of features, while maintaining an easy-to-use interface.
1.1. Target Audience
This guide is intended for all MacREM Users and will provide useful information on how to create an account and navigate the online application system.
1.2. Internet Settings
MacREM supports the latest versions of the following browsers:
- Microsoft Edge
- Mozilla Firefox
- Google Chrome
- Apple’s Safari
MacREM uses pop-ups. You will need to configure your browser to ensure MacREM pop-ups are allowed. MacREM does not support the Epic browser and the TOR browser has not received extensive testing.
1.3. Technical Support
Email – ethicsoffice@mcmaster.ca
Phone – 905-525-9140 ext. 23142
2. GETTING STARTED
2.1. Access the System
To access the Applicant side of MacREM go to: https://macrem.mcmaster.ca.
2.2. How to Log In
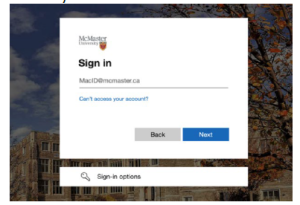
You can log into MacREM using your MacID – email address and password, and click Log in. You need to log in and out just once to activate your account.
3. NAVIGATING the MacREM System
Upon logging into MacREM, you will be directed to the Work Area. The Work Area is your home page where you will create new projects and find all current pending notifications.
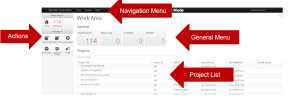
3.1. Navigation Menu
The Navigation Menu will always be visible at the top of the page no matter where you are in the system, and includes links to:
- Work Area – takes you to the Work Area/Home page
- Contacts – takes you to the Contacts page. For more information, please refer to section 3.3
- Help – The Help bar links to:
- Contact Information – Provides contact information for the MREB Research Ethics Office
- Help – Provides training materials for quick reference
- FAQ – Links to Frequently Asked Questions
- Templates – Links to REB Guidance Templates and Sample Documents
- About – Provides information about the McMaster Research Ethics Board (MREB)
- Account Settings – clicking on your name on the right-hand side of the Navigation Menu allows you to:
- Modify Personal Details
- View Notifications
- Logout
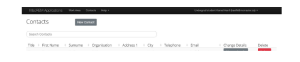
3.2. Contacts
This page lists all of the contacts you have saved to your personal address book in MacREM.
3.3. Actions Toolbar
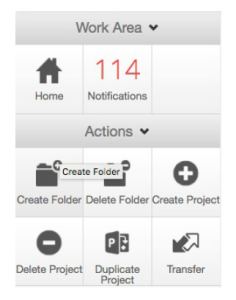 The Actions Toolbar will display all actions available in MacREM. The Actions Toolbar is dynamic and will only display the actions currently available to the user depending on what stage you’re at in the system.
3.3.1. Create Folder
Creating folders will help you easily organize your applications within MacREM. Whether you are working with several PIs, many research students or just simply want to organize between Full Board and Delegated, you can use the Create Folder function to do this.
- Click the ‘Create Folder’ tile
- Add a folder title (no more than 40 characters)
- Drag and drop the files from your list of Projects into the folder
- To move files out of the folder, click on the folder
- Click the ‘Move project’ tile from the Actions Toolbar on the left and
select the Project and Destination you wish for that file to move - Click ‘Move’
3.3.2. Delete Folder
- Once the folder is empty (see section 3.4.1 on how to ‘Move’ a project), you can delete the folder
- From the Home page/Work Area, click on the ‘Delete Folder’ tile
- Select the folder you wish to delete
- Click ‘Delete’ and confirm with ‘Yes’
3.3.3. Create Project
Clicking the ‘Create Project’ tile will bring up the Create Project dialog box.
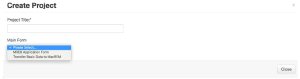
- Project Title: Enter your short title (fewer than 200 characters). This title will be used to access your file from the Project Menu, so ensure it is something unique.
- Main Form: Select MREB Application Form
For more information about how to Create a Project, review the: MacREM Applicant – QuickGuide: Creating a Project
3.3.4. Delete Project
Clicking the ‘Delete Project’ tile in the Action Toolbar will bring up the Delete Project pop up window. Select from the drop-down list the project you want to delete and click the ‘Delete’ button.
*NOTE: Projects that have been submitted for review cannot be deleted.
3.3.5. Duplicate Project
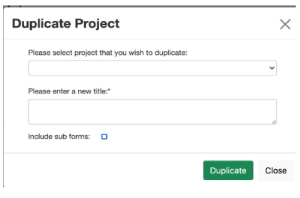
Clicking the ‘Duplicate Project’ tile will bring up the Duplicate Project dialog box.
-
-
-
- Select the project from the drop-down list you want to duplicate and click the ‘Duplicate’ button.
-
-
- The duplicated project will appear in your Projects Menu.
*NOTE: Duplicating a project will create an exact replica of the project, including all of the applications associated with the project – but excludes any documents uploaded in the original project (e.g., protocols, consent forms, etc.).
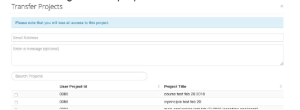
3.3.6. Transfer Project
MacREM facilitates transferring the ownership of a project from one person to another. Only the current Project Owner (the user who created the project) has the ability to initiate a transfer.
Once the project is transferred to another individual, it will no longer be listed on your project list and you will no longer have access to it unless the new owner shares the project with you.
- Click the ‘Transfer’ tile – this will bring up the Transfer Projects dialog box.
- Select the project you want to transfer from the list by clicking on the checkbox next to the User Project ID, or search for the project you want to transfer.
- Input the email address of the person to whom you are transferring the project. You can also enter a message to accompany the transfer.
Once the transfer request is complete, the transfer recipient will receive a notification through MacREM and his/her personal email. The transfer recipient can then accept or reject the transfer.
3.4 General Menu
The General Menu is the main hub for all notifications and is based on four distinct categories. The number listed in the corresponding title is the number of unread notifications. The General Menu tiles will only appear on the top of the Work Area/Home page.

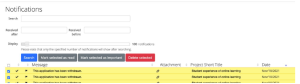
3.4.1. Notifications
Users will receive notifications whenever an event occurs on an application form within a Project. Clicking the Notification tile will bring you to the Notification page, which is similar to an email inbox.
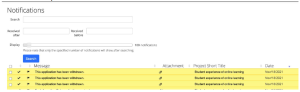
- You can search through the available notifications by keywords
- You can search through the available notifications by start and end date
- The display slider can be used to change the number of notifications returned as results once a search is completed.
- The check box to the left of each message can be used to select one or more messages at one time. You can select all messages at once by clicking the check box at the top left-hand side of the page.
- Selected messages can be marked as unread, marked as flagged, or deleted.
- Delete notifications by clicking the boxes on the right and selecting an action
*NOTE: Deleted notifications cannot be recovered.
3.4.2. Signatures
Clicking the Signatures tile will bring you to the Signatures page. Here, users can view Signatures that have been collected on the form, or Signature Requests, along with the status of the Signature or Signature Request (Valid, Invalid or Requested).

You can search through your pending and previous signature requests using the following criteria: Project Title, Requesting Username and Requested Date.
For more information about how to Sign an Application, review the: MacREM Applicant – QuickGuide: Signing an Application
3.4.3. Transfers
Clicking the Transfers tile will bring you to the Transfers page. You can search through the pending/completed transfer requests using the following criteria: Transfer ID, Project Title, Username and Date.
![]()
3.4.4. Shared

Clicking the Shared tile will bring you to the Shared Forms page. You will be presented with a list of forms that have been shared with you, along with related information.

*NOTE: These projects will only be ones that have been shared with you as an external team member (i.e., you are not the Project Owner / Form Owner or have a Role in the project).
To view the form that has been shared with you, click the ‘View Form’ button. The share can be rejected should you no longer wish to be a collaborator on an application form. Shared projects will also be available under the Project Menu in the Work Area.
3.5. Project Menu
The Project Menu on the Home Page/ Work Area contains a list of all of the Projects to which you currently have access. You can easily search this project menu by using the ‘Search Projects’ search bar.

If you would like to download a PDF copy of this QuickGuide, please click here