This QuickGuide outlines steps for creating a new project within MacREM.
To create a new project:
- Log into MacREM: https://macrem.mcmaster.ca
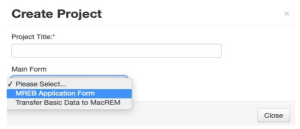
- Click on ‘Create Project’ from the Actions Toolbar and enter the following information:
- Project Title (less than 200 characters or about 28 average length words). This title will be used to access your file from the Project Menu
*NOTE: on the form you will be asked to enter a short title or acronym to save ‘real estate’ on the system screens. - Main Form. Select the appropriate application: in almost all cases this is the MREB
Application Form. The Transfer Basic Data to MacREM is a temporary form and procedure to migrate applications to the new system and is used by the Ethics Office only.
- The MREB Application Form will ask you if you want to create one of four projects – an MREB Standard Application, a Conditional Release of Funds Application, a Course-Based Application, and the Application for an External REB Clearance.
- Project Title (less than 200 characters or about 28 average length words). This title will be used to access your file from the Project Menu
- Click ‘Create’
- In the Navigation tab under Section 1 begin by answering the first screening questions:
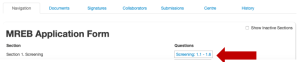
*NOTE: The first screening questions are to establish that the applicant is applying to the right REB. There are two REBs at McMaster, the Hamilton Integrated Research Ethics Board, or HiREB which reviews clinical trials and all research from the Faculty of Sciences, and MREB, which is the board of record using the MacREM system – all research on campus that is not medical or from the Health Sciences. - Adding the PI and Additional Study Personnel. Anyone who creates a project is considered the Applicant. The applicant may or may not be the Principal Investigator. There are several ways to add the PI if the applicant is creating the project on their behalf:
- In the top Menu – go to Contacts and click Add Contact. Fill the form for the PI. Not all these fields may be used on the actual application.
- In the actual application form in the Contact section for Principal Investigator, you can now click Load, which will prompt you to select from your list of Contacts. This list of contacts will be available for all future applications that you create.
- Documents. When you come to a question in the form which has a blue ‘Upload Document’ button within the question, you can then upload the document associated with that section. Clicking on the ‘Upload Document’ button will prompt you to upload your documents:
- Browse your computer for the document you wish to upload
- Provide a version date
- Provide a version number
- Click ‘Upload
NOTE: In some questions this will not appear until you are prompted by answering the question. Please be sure to work through the form in sequential order to ensure that no questions are missed.
- Submitting and Signing Once you have completed all of the required questions for your application you can then check to ensure that your project is complete by clicking the Completeness Check tile in the Actions Toolbar.
- If the application is complete you can then do one of the following:
- If you are the PI you can sign the application by clicking the blue Sign button on the last page of the application. You will be prompted to enter your Username and Password and click Sign.
- If you are not the PI you can request the signature of the PI by clicking the Request Signature button on the last page of the application. You will be prompted to enter the PI’s Email Address and click Sign.
- f you are a student and this is your project, you will have to request the signature of your Supervisor and also Sign the application as the Student PI.
*NOTE: Once all of the signatures have been signed the application is enabled to be automatically submitted.
Additional Information
- Comments – any user who has access to the application forms can add comments to other users. To add a comment, click on the comment bubble icon at the top right hand corner of each question. These comments are only viewable to applicants, not the REB.
- Help Text – some questions within MacREM have associated help texts. To view the help text click on (i) icon in the top right hand corner of each question.
- Previous / Next / Navigate – these three tiles on the left hand side in the Actions Toolbar will navigate you through the project and auto-save when pressed.
- Mandatory Questions – most questions are mandatory but entire sections are skipped depending on your Yes or No answers.
- Smart Form – it is advised to work through the form in chronological order as it is a smart form and questions may appear or disappear depending on the answers you provide.
Questions?
T. 905-525-9140 ext. 23142
E. ethicsoffice@mcmaster.ca
If you would like to download a PDF copy of this document, please click here.