| Application Status | Actions Toolbar – Project | Actions Toolbar – Application | Completing the Application |
1 – Application Status
Every form within a project will have the following information associated with it:
-
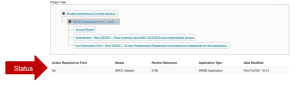 Action Required on Form – Yes indicates action is required and No indicates no action is required
- Status – current status of the form within the REB review process, such as Not Submitted, Submitted, Under Review,
- Review Reference – each form will receive a number once it has been This is also the MREB number.
- Application Type – Type of application
- Date Modified – the last date the status of the application changed
2 – Actions Toolbar – Within a Project
The Actions Toolbar will display all actions available in MacREM. The Actions Toolbar is dynamic and will only display the actions currently available to the user depending on what stage you’re at in the system.
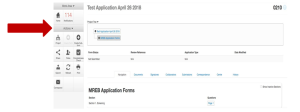
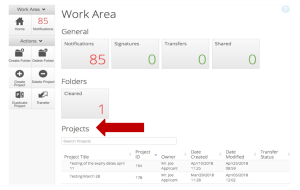
2.1 – Project Menu
The Project Menu contains a list of all the Projects to which you currently have access. You can easily search this project menu by using the ‘Search Projects’ search bar.
2.2 – Collaborating on a Project
By clicking on the Collaborators tile after opening a selected project, you can change the permissions that a person has for the study.
2.3 – Individual Form Sharing

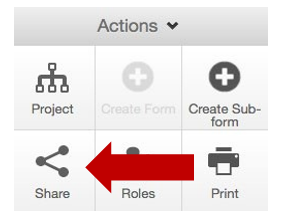 The Project Owner and/or Form Owner, can share access to the application and forms. The Share tile allows you to share the currently selected form with an individual on the study team. This action will only share the form you have selected. It will not share any other forms associated with the project.To complete the action, click the Share tile within the Actions Toolbar.
You will be presented with a dialog box where you can enter the collaborator’s MacID email address. (Some members of the McMaster community use an “alias” email address. Alias email addresses cannot be used in MacREM.)
If the email address entered is not registered to a user within MacREM, the system will display the following message: User does not exist in the system.
If the collaborator cannot be found, this means they have not previously logged into MacREM using their MacID. To activate their MacREM account, they just simply need to log in once using their MacID, and you can try Sharing with them again.
External collaborators who need access MacREM to review or sign the form will have to apply for a guest MacID. The Ethics Office can submit a request for external researchers to obtain a MacID. The request process is usually quick but depends on the workload of our UTS department.
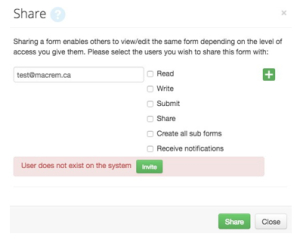
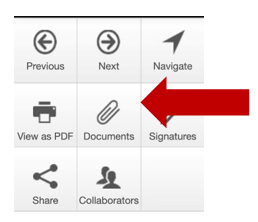
2.4 – View as PDF
B y clicking the View as PDF tile, a PDF version of the currently selected form can be printed. This PDF file can also be saved directly to your computer.*NOTE: You cannot print a blank copy of the form; only the sections you have completed will print.
3 – Actions Toolbar – Within an Application
3.1 – Previous/Next
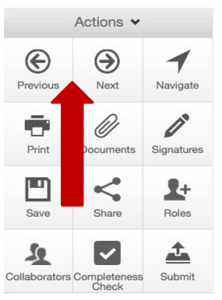
The two tiles highlighted in the image to the right, Previous and Next, are displayed once you have begun entering information into an application form. By clicking on the Previous/Next tiles, you will be directed to the Previous/Next section within the application form and all of your progress within the form to that point will be saved.
*NOTE: Clicking the Backspace or Delete button on your keyboard when you are not in a selected field will result in moving to the previous page and your work will NOT be saved.
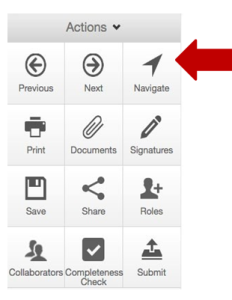
3.2 – Navigate
By clicking the Navigate tile, you will be directed back to the main page of the currently selected form. When you click on the Navigate tile, all of your progress within the form to that point will be saved. The Navigate tile allows you to skip from section to section within the application, instead of have to page through each section.
3.3 – Documents
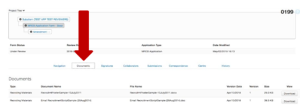
You can view all Documents uploaded in the currently selected application form by clicking the Documents tab from the application from the home page or by clicking the Documents tile within a selection of the application form. Clicking either of these links will present you with a list of all documents attached to the currently selected form, along with related information.
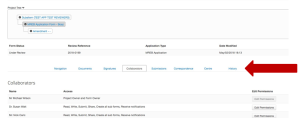
3.4 – Collaborators
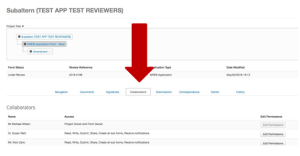
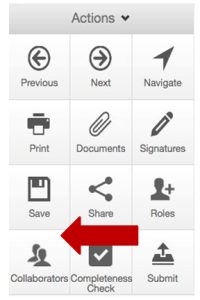
You can view a list of all collaborators in the currently selected application form by clicking the Collaborators tab from the application form home page or by clicking the Collaborators tile within a selection of the application form: Clicking either of these links will present you with a list of all collaborators currently listed on the project, along with related information. You are also able to edit Permissions from this list (without having to go into the form)

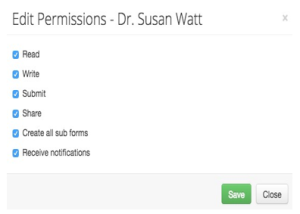
Click Edit Permissions and you will be presented with a dialog box, enabling you to edit that collaborator’s access level. Student researchers should check all permissions when Sharing with their Faculty Supervisor.
3.5 – Signatures
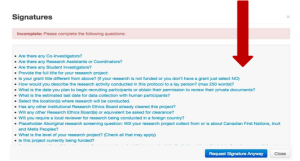
*NOTE: Only the Principal Investigator (Student PI and Faculty Supervisor) has the authority to sign off on a project. Therefore, when requesting a signature, only the PI’s signature should be requested.
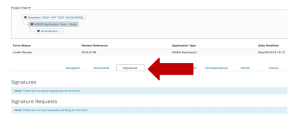
Once an application form is completed, it requires signatures before it can be submitted. You can view all active and pending Signatures in the currently selected application form by clicking the Signatures tab from the application form home page or by clicking the Signatures tile within a section of the application form:
 Clicking either of these links will present you with all active signatures on this form and all pending signature requests on this form. Signatures are sorted by the following columns:
- Type – displays the role of the signatory
- Signatory Email – displays the email of the person who signed the form
- Signed Date – displays the date the person signed the form
- Validity – all signatures will be labelled as valid and will lock the form to prevent further changes. Once a form is unlocked to make modifications, any previous signatures will be labelled as invalid. If you accidentally Sign and submit a form too soon, you can Unlock the form by going to the Signature page (last page) and clicking the Unlock tile.
3.5.1 – Requesting a Signature

If you are a study staff member or student who has completed the application form and needs the PI or Faculty Supervisor to sign the form, you can request the signature of the appropriate individual by clicking the ‘Request Signature’ button.
This will bring up a pop-up window where signature recipient’s email address can be entered, along with an optional message. Click the ‘Request’ button to complete the signature request

The person from whom you are requesting the signature will receive a notification email, and a MacREM notification on the project.
*NOTE: The system is currently configured to submit the application once signed – as the warning message indicates.
For more information about how to Sign an Application, review the MacREM Applicant – QuickGuide: Signing an Application
3.6 – How to Submit an Application
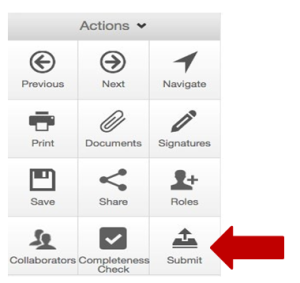
When the application is complete, to submit the application, you must click the Sign button and the system will check the form for completeness.
*NOTE: You can also check for completeness by clicking ‘Completeness Check’ next to ‘Submit’.
All unanswered mandatory questions will be highlighted by the system. Clicking an unanswered question link will direct you to that question within the application form.
Once all unanswered questions have been completed, your application will be submitted. You will be returned to a splash page that will inform you that your application is “Submission in progress”. If you go back to your application, which is now locked until you receive comments from the Ethics Office or Chair, you will see that the system has recorded the time of the signature.

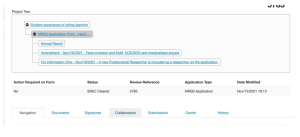
3.7 – Submissions
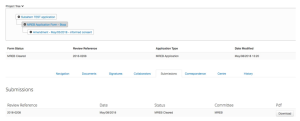 The Submissions tab can be found on the main page of the currently selected application form.
Clicking the Submissions tab will bring up a list of all previous submissions of the currently selected application form. Every time an application is submitted to the REB, a PDF snapshot is taken and a record of the submission is stored under the Submissions tab. When an application form is resubmitted to the REB due to required recommendations, previous submissions are archived. All Submissions can be downloaded in a PDF format.
For more information about how to Respond to Recommendations, review the MacREM Applicant – QuickGuide: How to Respond to Recommendations
3.8 – History
The History tab can be found on the main page of the currently selected application form.
Clicking the History tab will open a complete listing of events that have occurred for the selected application form. This includes signatures, submissions, and status changes throughout the REB review process. Certain historical actions will also have an accompanying attachment that can be downloaded in PDF format.
For more information about hot to Find an Approval Letter, review the MacREM Applicant – QuickGuide: How to Find a Clearance Letter
4 – Completing an Application Form
4.1 – Smart questions
The application forms used in MacREM are composed of smart questions. Depending on the answers you provide, certain questions may become available or remain hidden as they are not required. As you progress through the forms, you may notice the questions are not numbered sequentially. This is a result of the smart question functionality.*NOTE: It is therefore advised to complete the form in order of how the questions apply. Skipping ahead may result in entering a response that is not needed, or in not entering enough information.
4.2 – Comments
Any user who has access to the application forms can add comments for other users. To add a comment, click on the icon highlighted in the picture below.

You will be presented with all the comments related to that question. There is also a field where you can enter additional comments. By clicking the ‘+ Add Comment’ button, the comment will be save to the system.
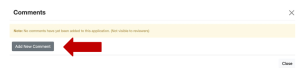
*NOTE: Only the person who adds the comments can edit and delete the comment and the comments are not submitted with the application.
4.3 – Help Text
Some questions within MacREM have associated help texts. To view the help text click on the icon (a white ‘i’ with a blue circle around it) as illustrated below:

The help text will appear in a pop-up window. To close the help text, click anywhere outside the pop-up window.
4.4 – Mandatory Questions
With few exceptions, most questions on the form will be mandatory and must be answered in order to submit the application. There are no questions where a “not applicable” will be an appropriate answer. Based on your Yes or No selection to some questions, entire sections of the form will be skipped.
4.5 – Documents Upload

You can upload documents by clicking the blue ‘Upload Document’ button associated within certain questions.
*NOTE: More opportunities to upload documents will appear as you complete the form.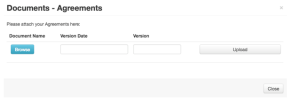 You can browse your computer for a file to upload. All major file types are supported, including Word documents, Excel documents, text files and PDFs. All documents should be uploaded with a proper name (the file name) that will help the REB to identify it. Once you have selected the file and inputted the Document Version Date and Version Number, to complete the upload process, click the ‘Upload’ button.
4.6 – Save but not quite Autosave
There is no “autosave” per se. You can save your progress at any time by clicking the Save tile in the Actions Toolbar. Your progress will also automatically save as you navigate from one page to the next, when you click the Navigate icon, submit an application or run the ‘Completeness Check’. It is advisable to click the Save icon if you are staying on a page for a long time to edit in case of internet interruption or other unforeseeable events.
Questions?
T. 905-525-9140 ext. 23142
E. ethicsoffice@mcmaster.ca
If you would like to download a Word copy of this QuickGuide, please click here.